
Tutorial
Register for our FREE Webinar series ‘101 Ways to Use Visuals2Go’
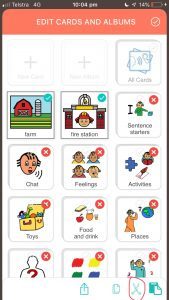
How to Create an Album
- On the home page, tap on the ‘Edit’
 (at the top right corner of the app)
 - Tap on ‘+ New Album’

- Add an image to your album and type a name for it.
- Tap on the ‘check’ icon.
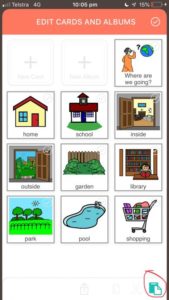
How to Edit an Album
- On the home page, tap on the ‘Edit’ icon
- (at the top right corner of the app)
- Tap on the album you want to edit,
- Tap on the options button
 (at the bottom of the page)
 - Select ‘Edit this Album.’
- Tap on the image and/or text to edit it.
- Tap on the ‘check’ icon.
How to Create a Card
- Enter an album
- Tap the the ‘Edit’ button and select ‘Add card.’
- Add an image by tapping the + button. You may choose an existing image from your Camera Roll or Search our increasing range of symbols and photos. (Go to our ‘Store’ to unlock more albums and images)
- You may also customise your card to preference by choosing your border style, text position and border colour.
- You may record your own voice for the card or use one of our text-to-speech voices. You may also phonetically type the word to ensure it says what it is suppose to say. *More voices may be unlocked at our ‘Store.’
How to Edit a card
- Enter into an album.
- Tap on the card you want to edit.
- At the top right corner, tap on the ‘Edit’ icon
 . Here you can change the image, card name and voice.
How to Use the Sentence bar
- Tap the Yellow bar at the bottom of the screen to open or close it.

- Open an album or folder to access the cards, tap on a card or hold onto a card and drag it to the sentence bar. You may also change it to double tap on a card to add to sentence bar by deactivating ‘one tap sentence strip’ in settings.
- To remove a card from the sentence bar simply double tap on the card or tap the arrow delete key.
* Note: You may change it to tapping once on a card to add on sentence bar by going to the app’s settings and select ‘one tap sentence bar’
How to Print your Visuals or Picture Cards
- Enter an album.
- Tap the ‘Edit’ button
- Select the cards you want to print.
- Tap the ‘Options’ button at the bottom of the screen.
- Select the ‘Add to Printing Template’ option.
- On the Print preview screen you may copy a card to the screen by tapping once on the card or double tap on a card to remove it from print.
- You may choose the template you want your cards to be put into. * More printing templates may be purchased from our ‘Store.’
- When you are ready, select the ‘Print’ icon. You may choose to email your cards or print directly to an Airprint compatible printer.
How to Reorder your cards
- Enter an album.
- Tap the ‘Edit’ button
- Hold down on the card you wish to reorder for 1 second.
- Drag to desired location.
How to Reorder your Albums
- Tap the ‘Edit’ button on the main Album page.
- Hold down on the Album you wish to reorder for 1 second.
- Drag to desired location.
How to Add a User Account
- On the main page, tap the top left corner to open the User Menu
- Tap the + button to add a new user

How to Delete a User Account
- Go to the User you want to delete,
- Go to ‘Settings’ on the app,
- Scroll right down to the bottom,
- Tap on ‘Delete account’.
How to change the User name
- On the User account you want to change your name to, go to ‘Settings,’
- Tap on the ‘Pencil’ icon to change the name.
* You cannot change the name of the ‘Default’ user.
How to move your cards to another Album
- Tap the ‘Edit’ button
- Select the cards you want to move and then tap on the ‘Cut’ icon (at the bottom right. Then tap on the ‘check’
 button.
3. Enter the folder you want to paste your cards into, select the ‘check’ ![]() button and tap on the ‘Paste icon.’
button and tap on the ‘Paste icon.’
Use the Choiceboard feature to select desired cards for choicemaking (Upgrade to the Professional version to unlock this feature):
- Enter an album,
- Tap the ‘Edit’ button,
- Select the cards you want to add to the Choiceboard,
- Tap the ‘options’ button at the bottom of the screen and choose ‘Create Choiceboard from … cards.’
* You may also print the choice board by tapping on the ‘Print’ button.’
How to Share a user profile to another device
- On the User account you want to share, go to ‘Settings,’
- Select ‘Share Profile,’
- Write down the ID number,
- On another device, create a new User account,
- Select ‘Import,’
- Type the ID number,
- Tap on ‘Import Profile’ and your user should be transferred onto your new device.
How to Import a User profile to another device.
- On the user menu, tap the + button to add a New User
- Tap on ‘Import’
- Input the code you got from a User sharing a profile into the ‘Import Profile’ box,
- Tap on ‘Import Profile’ Button,
- You may keep or change the name of the user, then tap on the check box.

How to Share an Album to another device
- On the user’s Home page, tap on the edit button (pencil icon)
- Select the album you want to share
- Then tap the options button
- Select ‘Import album’
- Write down the ID number,
- On another device, on the home page tap on the edit button
- Select ‘Add New Album’
- Select ‘Import Album’
- Type the ID number
- Select ‘Download Data’
How to manage subscriptions
All subscriptions and payments are managed directly via Apple iTunes. To view or make changes to your subscription, please visit:
Please email us if you find any difficulties with its operation: support@visuals2go.com
Register for our FREE Webinar series ‘101 Ways to Use Visuals2Go’
The app is constantly updated with new images and albums. You have a choice to upgrade the app with added features with individual inApp purchases or with a subscription.